Working with child controls in dialog boxes
When you drag a control on top of another control, they become attached. The top control is the child; the bottom control is its parent. You can attach controls to both group boxes and rectangle controls. When you move a parent control on top of another control, the controls attached to the original parent stay associated with the original parent. For example, you can place a group box of radio buttons on top of a rectangle control and the radio buttons remain children of the group box, not of the rectangle.
You can also add an unattached control to a parent control. This means that the unattached control is not controlled by the parent control. For example, resizing the parent does not affect the unattached control. A control can be unattached from its parent. This allows the control to work independently from the other child controls in the parent control (like a rectangle control or group box).
You can move a child control when the dialog box is resized. When you move a group box, any child controls (for example, radio buttons) move with it. By selecting a relative position for a control, the unlocked edges of a child control move relative to its position in the parent control.

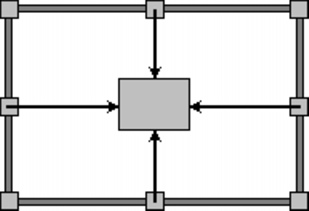
The arrows in this example show you that if you change settings, you can move a child control with the parent.
For more information about creating group boxes and rectangle controls, see “To add a group box to a dialog box” and “To add a rectangle control to a dialog box.” For more information about linking group boxes and rectangle controls, see “Examples of linking controls.”
To attach a control to group boxes and rectangle controls |
|
1.
|
|
Click the Quick tab
|
|
2.
|
|
Double-click a dialog box.
|
|
3.
|
|
Drag a control onto a rectangle control or group box.
|
|
4.
|
|
Right-click the parent control, and click Properties
|
![]()
|
•
|
|
For information about adding buttons, radio buttons, or check boxes to group boxes and rectangle controls, see “To add a group box to a dialog box” and “To add a rectangle control to a dialog box.”
|
|
•
|
|
Child controls must cover only the parent control. Controls partially covering one another will not attach.
|
To add an unattached control to a parent control |
|
1.
|
|
Click the Quick tab
|
|
2.
|
|
Double-click a dialog box.
|
|
3.
|
|
Select a control.
|
|
4.
|
|
Right-click the parent control, and click Properties
|
|
5.
|
|
Click Insert, and click a control.
|
|
6.
|
|
Drag the new control onto the parent control.
|
|
7.
|
|
Right-click the parent control, and click Properties
|
To separate a control from a parent control |
|
1.
|
|
Click the Quick tab
|
|
2.
|
|
Double-click a dialog box.
|
|
3.
|
|
Drag the child control onto the dialog box outside of the parent control.
|
|
4.
|
|
Select the parent control.
|
|
5.
|
|
Right-click the parent control, and click Properties
|
|
6.
|
|
Drag the control back onto the parent control.
|
To reposition a child control within a resized dialog box |
|
1.
|
|
Click the Quick tab
|
|
2.
|
|
Double-click a dialog box.
|
|
3.
|
|
Right-click a control, and click Properties
|
|
4.
|
|
In the Position adjust area, enable any of the following options:
|
|
•
|
Depend on parent — locks each edge of the child control in place so that the child resizes in proportion to the proportions of the resized parent control
|
|
•
|
Center horizontally — centers the control between the left and right sides of the resized parent control
|
|
•
|
Center vertically — centers the control between the top and bottom sides of the resized parent control
|
|
5.
|
|
In the Position relative to area, enable any of the following check boxes:
|
|
•
|
Top — unlocks the top edge of the control
|
|
•
|
Bottom — unlocks the bottom edge of the control
|
|
•
|
Left — unlocks the left edge of the control
|
|
•
|
Right — unlocks the right edge of the control
|
|
6.
|
|
Drag the lower-right corner of the dialog box window to resize the parent control.
|