Restricting and annotating cell data
You can restrict a cell so that Quattro Pro read the data in the cell as a specific data type, regardless of what the data is.
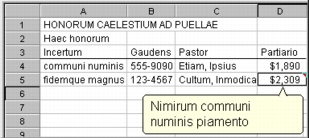
Adding comments to cells lets you add notes to explain data without cluttering the spreadsheet. Cells with an attached comment display a red triangle in the upper-right corner. By default, cell comments do not print with a spreadsheet, but you can set up the page view to show and print comments on the spreadsheet. For information about printing comments with the spreadsheet, see “To print cell comments.”

This is an example of cell comments.
Once you have created a cell comments, you can change its attributes.
To restrict cells |
|
1.
|
|
Select a cells to restrict.
|
|
2.
|
|
Click Format
|
|
3.
|
|
Click the Constraints tab.
|
|
4.
|
|
In the Data input constraint area, enable one of the following options:
|
|
•
|
General — accepts both labels and dates
|
|
•
|
Labels only — accepts only labels
|
|
•
|
Dates only — accepts only dates
|
To add a cell comment |
|
1.
|
|
Click a cell.
|
|
2.
|
|
Click Insert
|
|
3.
|
|
Type the comment.
|
|
4.
|
|
Click outside the comment bubble.
|
![]()
|
•
|
|
You can add a non-bubble comment to a cell by typing a semicolon (;) after a value and then typing the comment. You can see the comment on the input line when you click the cell.
|
To view all cell comments on a spreadsheet |
|
•
|
|
Click View
|
To change cell comment attributes |  gif" alt="Back to Top" border="0" height="10" width="10">
 |
|
1.
|
|
Right-click the cell, and click Edit comment.
|
|
2.
|
|
Right-click inside the comment bubble, and click Cell comment properties.
|