Copying and moving cells, rows, and columns
Quattro Pro lets you copy or move cells. You can copy or move cells by selecting the cells directly on a spreadsheet or you can copy cells by specifying the location of the cell.
You can control what you copy or move by specifying the type of data or cell properties to be moved. For example, you can copy data without copying its properties, or you can copy properties without copying data.
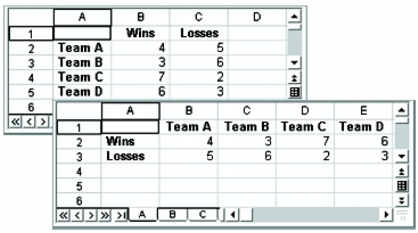
Quattro Pro also lets you transpose columns to rows and rows to columns. For example, after transposing columns and rows, all data in a column can be transposed to display as a row.

This is an example of a column transposed to appear as a row.
Moving selected cells by dragging
Quattro Pro lets you visually choose exactly where to move selected cells by dragging the cells. You can move cells anywhere on the active spreadsheet, to another spreadsheet, or to another notebook. A colored outline of the cell selection moves with a four-way arrow as a guide to help you locate an area to which to move cells.
You can modify the delay time of the arrow that displays when you drag a selection of cells.
To copy and paste cells |
|
1.
|
|
Select the cells to copy.
|
|
2.
|
|
Click Edit
|
|
3.
|
|
Select the destination cells within the active spreadsheet.
|
|
4.
|
|
Click Edit
|
![]()
|
•
|
|
When you copy a selection of cells to a specific cell, the Clipboard uses that cell as the upper-left position of the copied information.
|
![]()
|
•
|
|
You can also copy a cell to the input line of another cell, a text box, another spreadsheet in the notebook, or another notebook.
|
To copy cells to a specified location |
|
1.
|
|
Click Edit
|
|
2.
|
|
In the From box, specify the cells to copy.
|
|
3.
|
|
In the To box, specify the destination cells.
|
|
If you copy cells containing absolute references, enable the Model copy check box.
|
![]()
|
•
|
|
Instead of specifying the cells you want to copy, you can press F3 and choose a named cell from the Cell names dialog box.
|
To copy specific types of data, properties, and comments from selected cells |
|
1.
|
|
Select the cells to copy.
|
|
2.
|
|
Click Edit
|
|
3.
|
|
Select the destination cells.
|
|
4.
|
|
Click Edit
|
|
5.
|
|
Enable any of the check boxes in the Paste area to specify what to copy.
|
|
If you want the copied cells to be updated when the source cells are, link the copied cells to the source cells by clicking Link in the Paste special dialog box.
|
To transpose columns and rows |
|
1.
|
|
Select the column or row of cells to transpose.
|
|
2.
|
|
Click Tools
|
|
3.
|
|
In the To field, specify the top-left cell where you want to copy the transposed data.
|
![]()
|
•
|
|
If you transpose cells containing formulas, cell references do not adjust properly.
|
|
•
|
|
If you specify a cell within the source cells, the data will not display properly.
|
To move cells by cutting and pasting |
|
1.
|
|
Select the cells to move.
|
|
2.
|
|
Click Edit
|
|
3.
|
|
Select the destination cells within the active spreadsheet.
|
|
4.
|
|
Click Edit
|
![]()
|
•
|
|
You can also move a cell to the input line of another cell, a text box, another spreadsheet in the notebook, or another notebook.
|
To move cells by dragging |
|
1.
|
|
Select a cell or cells.
|
|
2.
|
|
Point to an edge of the cells until a four-way arrow displays.
|
|
3.
|
|
Drag the cells to the destination area.
|
![]()
|
•
|
|
You can use the colored outline as a guide when you move cells.
|
![]()
|
•
|
|
You can copy a cell by holding down Ctrl as you drag.
|
To move cells to another spreadsheet by dragging |
|
1.
|
|
Click Window
|
|
2.
|
|
Click Window
|
|
3.
|
|
In the window view that represents the destination spreadsheet, click the tab for the spreadsheet to which you want to drag the cell.
|
|
4.
|
|
In the window view that represents the source of the cells, select a cell or cells.
|
|
5.
|
|
Point to an edge of the cells until a four-way arrow displays.
|
|
6.
|
|
Drag the cells to the destination area.
|
To move cells to another notebook by dragging |
|
1.
|
|
Open the notebook to which you want to drag the selected cells.
|
|
2.
|
|
Select the cell or cells that you want to move.
|
|
3.
|
|
Point to an edge of the cells until a four-way arrow displays.
|
|
4.
|
|
Drag the cells onto the notebook name on the application bar that is the notebook you want to move the cells to.
|
|
5.
|
|
Hold down the left mouse button until the second notebook displays, and drag the cells into the notebook.
|
To change the delay time for the drag-and-drop arrow |
|
1.
|
|
Click Tools
|
|
2.
|
|
In the list of categories, double-click Workspaces, Application, and click General.
|
|
3.
|
|
Type a new interval time in the Cell drag and drop delay time box.
|