Creating a bar format
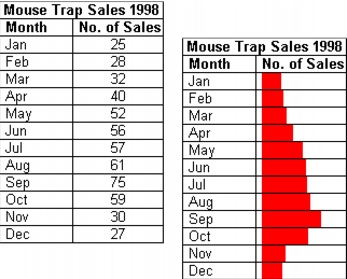
Applying a bar format to numeric values lets you visually identify patterns or anomalies in numeric data. By displaying numeric values as horizontal bars you create a graphical representation of your data. For example, consider a mousetrap company that tracks monthly sales for 1998. By viewing these figures using a bar format, you can view any sales trends for the year and quickly identify the month with the highest and lowest sales records.

In this example, the monthly sales figures for 1998 are shown using numbers and then using the bar format.
You can also change the color of the bar and the limits of the bar range. By default, Quattro Pro colors bars red and uses a bar range of 0 to 100.
To apply a bar format to numeric values |
|
1.
|
|
Select the cells to which you want to apply the format.
|
|
2.
|
|
Click Format
|
|
3.
|
|
Click the Numeric format tab.
|
|
4.
|
|
Click Custom from the Numeric formats list.
|
|
5.
|
|
Choose one of the following bar formats from the Custom list:
|
|
•
|
Left bar — displays the number as a red bar starting at the left of the cell
|
|
•
|
Right bar — displays the number as a red bar starting at the right of the cell
|
|
•
|
Center bar — displays the number as a red bar starting in the center of the cell
|
To change the color of a bar format |
|
1.
|
|
Select the cells for which you want to edit the bar color.
|
|
2.
|
|
Click Format
|
|
3.
|
|
Click the Numeric format tab.
|
|
4.
|
|
Click Edit.
|
|
5.
|
|
Select the format statements, from the list under the Format name box.
|
|
6.
|
|
In the Format code area, select the bar format code in the Format code box.
|
|
7.
|
|
Open the Color picker
|
To change the range limit of a bar format |
|
1.
|
|
Select the cells for which you want to edit the bar range.
|
|
2.
|
|
Click Format
|
|
3.
|
|
Click the Numeric format tab.
|
|
4.
|
|
Click Edit.
|
|
5.
|
|
Select the format statements, from the list under the Format name box.
|
|
6.
|
|
In the Bar format values area, choose one of the following limits from the Lower limit list box:
|
|
•
|
Value — Quattro Pro uses as the lower limit the value you type in the box.
|
|
•
|
Other cell — Quattro Pro uses as the lower limit the value of another cell you specify in the box that is either relative to the current cell or an absolute cell address.
|
|
7.
|
|
Choose one of the following limits from the Upper limit list box in the Bar format values area:
|
|
•
|
Value
|
|
•
|
Other cell
|