Sorting data
Sorting data lets you order multiple criteria based on sort keys within a sort selection. For example, you can sort data in ascending order.
Sorting data in ascending order organizes a selection in the following sequence:
|
•
|
|
values in numeric order
|
|
•
|
|
labels beginning with special characters in ASCII order
|
|
•
|
|
labels beginning with numbers in numeric order
|
|
•
|
|
labels beginning with letters in alphabetic order
|
|
•
|
|
blank cells
|
For example, if you sort data in an address book in ascending order using the sort key “LAST_NAME,” all last names display in alphabetic order, starting with “A.”
Up to five sort keys can be specified. Sorting begins with the first key; however, if there are two identical entries, Quattro Pro looks at the second key for those particular entries. If the first two fields are identical, the third key determines sort order, and so on.

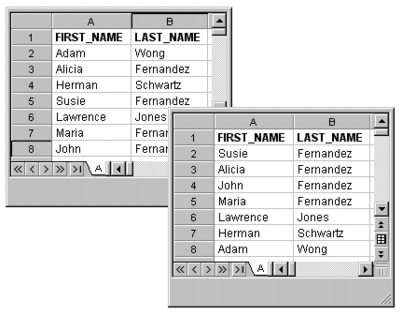
This example shows a list of names before and after you sort by LAST_NAME, in ascending order.
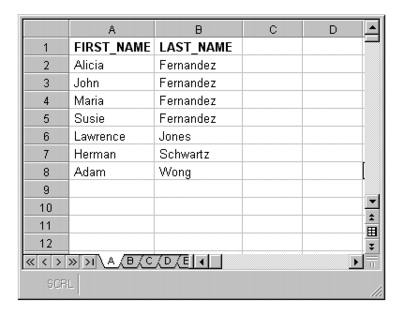
If you add the FIRST_NAME field as the second sort key, the Fernandez records would sort in this order:

The results of sorting the same name list by LAST_NAME, and then by FIRST_NAME, in ascending order.
You can also sort data automatically, reverse previous sort settings, and preserve the original sort order so you don’t lose a particular organization of data.
Data added to a spreadsheet after sorting data is not displayed in the sorted order. To include the new data in the correct sort order, you must re-sort the data . Likewise, formulas that refer to cells outside of their row do not update when you re-sort data. If your sort selection contains formulas that reference cells outside the sort selection (for example, +A2), make them absolute (+$A$2) or convert them to their end values before sorting. For more information about making cell addresses absolute, see “Setting cell addresses.” For more information about converting formulas to values, see “To convert a formula to a value.”
To sort data |
|
1.
|
|
Click Tools
|
|
2.
|
|
Click the Range picker
|
|
If the data contains a heading row, enable the Selection contains a heading check box.
|
|
3.
|
|
In the Top to bottom area, choose a sort key from the 1st list box.
|
|
If you want to change the sort options, click Options, and change the settings you want.
|
|
4.
|
|
If you want to sort in ascending order, enable the Ascending check box.
|
![]()
|
•
|
|
By default, the data sorts by columns (top to bottom).
|
![]()
|
•
|
|
You can also select a sort key option by double-clicking in the 1st list box in the Top to bottom area, and selecting cells with the Range picker.
|
To sort data automatically |  otopproc.gif" alt="Back to Top" border="0" height="10" width="10">
 |
|
1.
|
|
Select the cells to sort.
|
|
2.
|
|
Hold down Shift + Ctrl, and click the column to use as the first sort key.
|
|
If you want to use a second sort key, click that column next, and so on. You can specify up to five sort keys.
|
|
3.
|
|
Click one of the Sort
|
![]()
|
•
|
|
The sort settings are saved until you select different ones.
|
To reuse previous sort settings |
|
1.
|
|
Click Tools
|
|
2.
|
|
Choose a sort setting from the Previous sorts list box.
|
![]()
|
•
|
|
The Data sort dialog box retains up to five previous sort settings at a time. Previous sort settings are saved with the notebook.
|
To preserve the original sort order |
|
1.
|
|
Insert an extra column in the sort area before sorting data.
|
|
2.
|
|
Click Edit
|
|
3.
|
|
Click the Range picker
|
![]()
|
•
|
|
You can restore the original sort order by clicking a cell in the new column and clicking the top (ascending) Sort
|