Creating text box graphics
Quattro Pro lets you create a text box. You can link a label cell to a text box so that the text box displays the text in the cell.
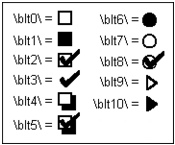
You can add bullets to a text box by typing a reference code.

These are the available bullets and the codes to create them.
Once you create a text box, you can modify its properties to achieve a variety of different effects. You can customize text box borders and box type. Quattro Pro also lets you convert regular text in 3D text or create a text box with a transparent box border.
To create a text box |
|
1.
|
|
Click Insert
|
|
2.
|
|
Drag to create the text box.
|
![]()
|
•
|
|
You can also create a text box by clicking the Text box
|
|
•
|
|
You can add a text box to a chart or map by clicking the center of the chart or map.
|
To link a label cell to a text box |
|
1.
|
|
Click a text box.
|
|
2.
|
|
Type a backslash (\), a forward slash (/), the cell reference, and a closing backslash.
|
|
For example, \/A:A1\
|
|
3.
|
|
Click outside the text box.
|
To add bullets to a text box |
|
1.
|
|
Click a text box.
|
|
2.
|
|
In a text box, type a bullet code,
|
|
For example, \BLT1\ or \BLT2\.
|
|
3.
|
|
Click outside the text box.
|
![]()
|
•
|
|
For a complete list of bullet codes, see “Creating text box graphics.”
|
To customize a text box border or box type |
|
1.
|
|
Click a text box.
|
|
2.
|
|
Click Format
|
|
3.
|
|
Click any of the following tabs, and modify any settings:
|
|
•
|
Alignment — lets you change alignment
|
|
•
|
Text font — lets you change face, size, and appearance
|
|
•
|
Text settings — lets you change the fill style and color of the text
|
|
•
|
Box settings — lets you change the frame around the text box
|
|
•
|
Fill settings — lets you change the background of the text box
|
To convert text in a text box to 3D |
|
1.
|
|
Click a text box.
|
|
2.
|
|
Click Format
|
|
3.
|
|
Click the Text settings tab.
|
|
4.
|
|
Choose 3D from the Fill style list box.
|
|
5.
|
|
Click a 3D style from the 3D style palette.
|
|
|
|
6.
|
|
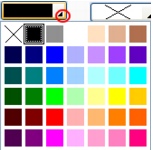
Open the Color picker, and click a color.
|
 |
|
7.
|
|
Open the Background color picker, and click a background color.
|
 |
|
8.
|
|
Move the Perspective slider.
|
|
If you want to shade the text, enable the Shaded check box.
|
To create a text box with a transparent box border |
|
1.
|
|
Click a text box.
|
|
2.
|
|
Click Format
|
|
3.
|
|
Click the Box settings tab.
|
|
4.
|
|
Open the Fill color picker, and click No color.
|
 |
|
5.
|
|
Click No frame
|